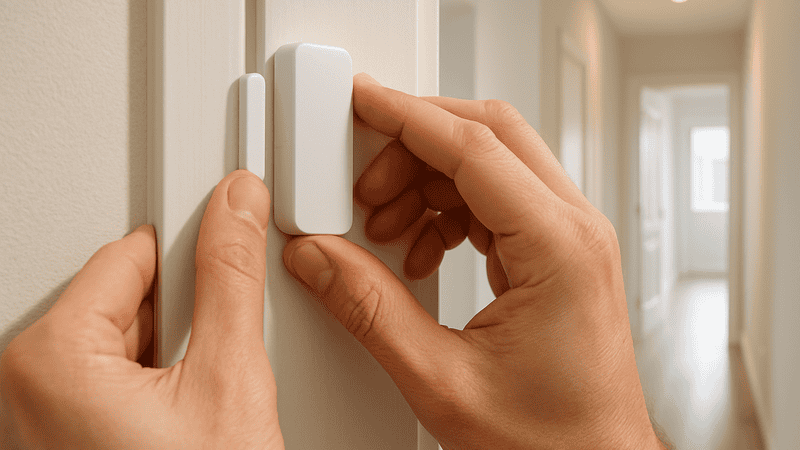
Most door alarms today install with adhesive strips or a simple over-the-door hook, no drill and no screws required. You peel a backing, press the sensor against the door and frame, and test it. The whole job takes under two minutes and leaves nothing behind but the alarm itself. This makes them ideal for rentals, dorms, hotel rooms, and any door where damage isn’t an option.
A door alarm only works if it’s actually on the door. That sounds obvious, but I’ve talked to plenty of people who bought one, read the instructions, saw the word “mounting,” and put the box in a drawer instead. Renters worry about losing a deposit. College students worry about their RA. Adult children worry about drilling into a parent’s front door. None of that hesitation is necessary.
I want you to hear an alarm go off before an intruder ever gets past your door — not after. That means the alarm has to be installed, and installed correctly, tonight, not “eventually.” This walkthrough shows you exactly how to mount a door alarm with zero tools, zero damage, and full confidence it will fire when it needs to.
What do I need before I start installing a door alarm?
You need three things: the alarm unit, a clean door and frame surface, and two minutes of uninterrupted time. That’s the entire list. No screwdriver, no drill, no anchors.
Most modern door alarms — including the hotel door alarm for travel style units — rely on either a strong adhesive pad or a slide-on bracket that hooks over the door edge itself. Check your specific model’s packaging for which method it uses before you start, since prep is slightly different for each.
If your alarm uses adhesive, you’ll also want a dry cloth and, if available, a small alcohol wipe. Not required, but it improves adhesion significantly on doors that have accumulated dust, wax, or cleaning residue.
How do I clean the surface so the alarm actually sticks?
Wipe down the exact spot where the sensor and magnet will sit — both the door and the frame — with a dry cloth first. This removes loose dust that adhesive can’t bond through.
Follow with an alcohol wipe if you have one. This step matters more than most people expect. Adhesive-backed alarms fail for one reason more than any other: someone stuck the pad onto a dusty or oily surface and it let go three weeks later. A ten-second wipe-down prevents that entirely.
Let the surface air-dry for thirty seconds before applying anything. Rushing this step is the single most common installation mistake I hear about from customers who call asking why their alarm fell off.
Where exactly should I place the door alarm?
Place the main sensor unit on the door frame and the magnet on the door itself, positioned so they align when the door is fully closed. Most kits include a visual guide or a small gap tolerance printed on the packaging — check it before you commit to adhesive placement, since repositioning adhesive-backed units can weaken the bond.
For hinge-side doors, mount near the top corner, away from the hinge itself. For doors that swing wide, the strike-side corner near the doorknob usually gives the cleanest, most stable magnetic connection. Test the door’s swing through its full arc before finalizing placement — you want to confirm nothing rubs or catches.
If you’re installing on a sliding door or window instead, the horizontal alignment matters more than vertical. The door and window alarms for sleepwalkers category covers this exact use case, since sliding tracks require slightly different sensor spacing than a standard hinged door.
How do I test the alarm without waking the whole house?
Most units have a low-volume test mode or a brief arm/disarm sequence you can trigger manually before setting it to full alert. Check the instructions for a test button — nearly every alarm on the market includes one specifically so you’re not blasting a 120-decibel siren at 11pm during setup.
Open the door slowly, no more than an inch, and confirm the alarm registers the break in contact. Close it again and confirm it resets. Do this three times. Reliability testing isn’t paranoia — it’s the difference between an alarm that’s decorative and one that’s functional.
If the alarm doesn’t trigger on the first inch of movement, your sensor and magnet are likely misaligned or spaced too far apart. Reposition, re-test, and don’t walk away until you get three consistent triggers in a row.
What if I need to remove the alarm later without leaving marks?
Peel adhesive-backed units slowly, at a low angle, rather than pulling straight out. This is the same technique used for removing picture-hanging strips — a slow, parallel peel breaks the adhesive bond gradually instead of stressing the paint or finish underneath.
If any residue remains, a small amount of rubbing alcohol on a cloth removes it without damaging most paint, wood finish, or metal door frames. Avoid this step on unfinished or unsealed wood, where a plain dry cloth is safer.
Bracket-style and hook-over alarms need no removal process at all — they simply lift off. This is one reason renters specifically gravitate toward that style, along with anyone who moves frequently or manages a property they don’t own.
Do I need a different alarm for different rooms in my house?
Not necessarily, but certain households benefit from alarms built for a specific concern. If you’re monitoring a family member who wanders at night, the door and window alarms for dementia patients are built with that exact scenario in mind — quieter arm/disarm sequences for caregivers, louder alert tones for the wandering risk itself.
If small children are the concern — a toddler who’s figured out how to reach a doorknob — the door and window alarms for kids and toddlers category is designed around that same no-damage, quick-install standard, sized and calibrated for interior doors rather than exterior entry points.
For anyone who travels regularly and wants a portable version of this same peace of mind, I wrote a full breakdown of my own routine in Travel Door Alarms: The Compact Security Tool I Never Check Into a Hotel Without. Same principle — different location.
Should I pair a door alarm with anything else?
A door alarm buys you time and warning. What you do with that warning is up to you. Some people keep a personal alarm on their keychain for the walk to their car. Others prefer something layered — like a stun gun with alarm built into one unit, so the same device that wakes the house also gives you a hands-on option if someone’s already inside the room.
I’m not telling you to stack every device in the house. I’m telling you that a door alarm is one link in a chain, not the whole chain. Know what your next step is before you ever need it.
Frequently Asked Questions About Installing a Door Alarm Without Damage
Will adhesive door alarms damage paint or wood finish?
Properly applied adhesive door alarms rarely damage paint or finished wood when removed correctly. Peel slowly at a low angle rather than pulling straight off. Any leftover residue comes off with a cloth and a small amount of rubbing alcohol on most sealed surfaces. Avoid this on unfinished or unsealed wood.
How long does adhesive last before it needs to be replaced?
Most adhesive backings hold securely for several months to over a year with normal door use. Humidity, temperature swings, and dust buildup on the mounting surface are the main factors that shorten adhesive life. If your alarm shifts or falls, clean the surface and apply a fresh adhesive pad rather than reusing the old one.
Can I install a door alarm on a rented apartment door?
Yes. Adhesive-backed and bracket-style door alarms are specifically designed for no-damage installation, which makes them a common choice in rentals, dorms, and hotel rooms. Always check your lease terms, but the physical installation itself requires no drilling, no screws, and leaves no lasting marks when removed.
What’s the difference between an adhesive alarm and a bracket alarm?
Adhesive alarms use a strong sticky backing to attach directly to the door and frame. Bracket or hook-style alarms slide over the top edge of the door with no adhesive at all. Bracket styles are the fastest to install and remove, while adhesive styles tend to sit lower profile and less visible.
Why isn’t my door alarm triggering when I open the door?
This almost always means the sensor and magnet aren’t aligned closely enough, or the surface prep was skipped and the unit has shifted slightly. Re-clean the mounting surface, reposition the pieces so they align when the door is fully closed, and test with small, incremental door openings until you get three consistent triggers.
Can I use the same door alarm on a sliding door?
Some models work on sliding doors and windows, but the sensor spacing and alignment differ from a standard hinged door. Check the specific alarm’s compatibility before installing, and consider a model built specifically for sliding tracks if that’s your primary door type.
How loud should a door alarm be to actually wake someone up?
Most effective home door alarms sit between 100 and 130 decibels, loud enough to wake a sleeping adult in another room and alert neighbors in close quarters like apartments. Confirm the decibel rating before purchase, particularly if the alarm is meant to protect a bedroom on a different floor than the entry point.
Do I need to remove the alarm every time I open the door normally?
No. Nearly every door alarm includes a simple arm and disarm function, often a twist, slide, or button press, so you can open the door normally without triggering the siren. The alarm stays mounted permanently and you control when it’s active.
An alarm sitting in its box protects nobody. The value isn’t in owning one — it’s in hearing it go off at the exact moment you need the warning, because you took two minutes to put it where it belongs. That’s the whole job. No drill, no landlord call, no excuse left standing.
If you’re ready to get one on your door tonight, start with a model built for your specific situation, whether that’s a rental, a family member who wanders, or a room full of curious kids — and get it mounted before you need it, not after.